In-App Help was last updated in 8.6.4 (released 10/23/2019) if you are looking for help with a feature that has been added or enhanced since 8.6.4, please check in Online Help from Help menu.

You are here: Demand Manager for Administrative Users > Canceling an Admission, Transfer, or Discharge Event with the ADT Functions Window

Canceling an Admission, Transfer, or Discharge Event with the ADT Functions Window

The Cancel Transfer option is only available if the patient has a transfer event on file for a single facility. You cannot cancel a patient transfer between facilities. See Canceling Patient Transfers Across Facilities for more information.

The Cancel Discharge option is only available if the patient has a discharge event on file.

Complete the following steps to cancel an admission, transfer, or discharge event:

  1. Locate the patient using the Patient Finder page or the Administer ADT Events page.
    1. To use the Patient Finder page, from the Demand menu, select Patient Finder. This opens the Patient Finder page.
      1. Select the number to search by: Encounter Number or Medical Record Number.
      2. Enter the number in the box.
      3. Click Add. This moves the number into the Selected Numbers box.
      4. Click Search. The page updates to show your search results.
      5. Click the ADT link at the end of the patient information row. This opens the ADT Functions window.
    2. To use the Administer ADT Events page, from the Tools menu, select Administer ADT Transactions. This opens the Administer ADT Transactions page.
      1. Select the number to search by: Encounter Number or Medical Record Number.
      2. Enter the number in the box.
      3. Click Add. This moves the number into the Selected Numbers box.
      4. Click Search. The page updates to show your search results.
      5. Click the ADT link at the end of the patient information row. This opens the ADT Functions window.
  2. Select a Cancel option from the Event menu. The window completes the rest of the boxes based on the selected event.
  3. Click Save Event.
  4. An alert box opens with the message Cancel [event] for [Patient Last Name], [Patient First Name]?
  5. Click OK. After Demand Manager processes the new event, it lists the event in the event section of the Patient Information table.
  6. Click Close to return to the main page.

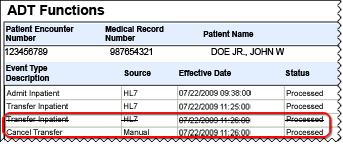
Once you cancel an event, the window displays the canceled event with a line through it. This keeps a record of the original event and the fact that someone later canceled it. Demand Manager automatically gives the cancel event the same effective time as the event being canceled.

CAUTIONS: You must enter the patient encounter or medical record number exactly as the application displays it. If the number is 00003456789, you must enter the entire number, including the zeroes. When in doubt as to the exact number, you should run the Patient List report to confirm.

Organizations with CareAware iBus and Cerner Millennium environments must use care when creating manual ADT events. Patient information, including encounter numbers and locations, must match in Staff Manager and Millennium. ADT events created in Staff Manager are not sent to the iBus and will not update Millennium.

Related Topics IconRelated Topics