In-App Help was last updated in 8.6.4 (released 10/23/2019) if you are looking for help with a feature that has been added or enhanced since 8.6.4, please check in Online Help from Help menu.
Configuring External Resource Management
You can configure Staff Manager to interface with third-party vendor management applications (such as MedAssets Workforce Solutions) and third-party Human Resources and Time and Attendance applications (such as PeopleSoft).
If your application is configured with one or more of these interfaces, there is an additional link on the Configure menu called External Resource Management. If your application is not configured with such an interface, this link is not displayed.
Use the External Resource Management page to add, edit, copy, and remove vendor configurations. This topic reviews a basic ERM interface configuration. If you want to configure the Vortex interface for ShiftAlerts, you should refer to the topic Configuring ShiftAlert for more precise instructions on configuring that interface.
How the External Resource Management Page Changes Based on Vendor Selection
When you are configuring a PeopleSoft interface, several options on the External Resource Management page are not necessary and are not displayed. These options include:
- Product URL
- Error Threshold
- Add Assigned Employee
- Employee Number
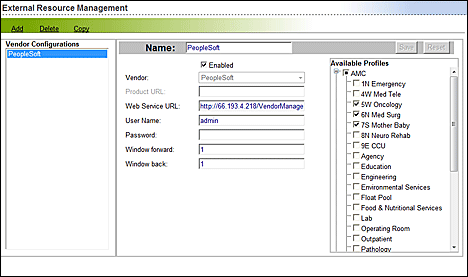
The following illustration shows the External Resource Management page when the vendor is PeopleSoft.
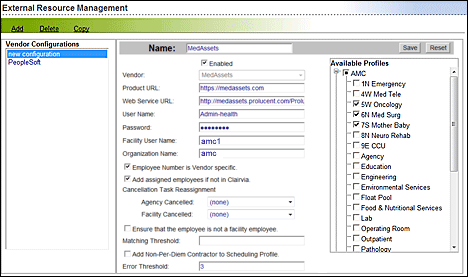
This illustration shows the External Resource Management page when the vendor is a vendor management application such as MedAssets.
Adding a Vendor Configuration
The Add Configuration function creates a new blank configuration form with the Name box highlighted. Complete the following steps to add a vendor configuration:
- From the Configure menu, select External Resource Management. This opens the External Resource Management page.
- Click the Add link.
- Click OK when asked Create new Vendor Configuration?
- Select the Enabled box. This alerts Staff Manager that it should use this configuration as soon as you save it. If you want to set up the configuration without enabling it, you should leave the check box deselected. You can clear the Enable box at any time to turn off a configuration without losing its settings.
- Enter information for the following boxes.
- Name: This free text box enables you to enter up to 32 characters. Names must be unique; for example, you cannot have two configurations named Agency, but the names Agency1 and Agency2 are acceptable. For ERM applications, enter the label the Opportunity dialogs should display when showing pending candidate counts.
- Vendor: Select the desired external application from the menu.
- Product URL: The Product URL is the URL for users to work with the vendor application. Enter the URL used to link clients to the vendor's application from within Staff Manager. This free text box enables users to enter up to 2048 characters.
- Web Service URL: The Web Service URL is the URL Staff Manager uses to update the vendor application directly. Enter the URL the application should use to access the vendor application. This free text box enables you to enter up to 2048 characters.
- User Name: Enter the user name used by Staff Manager to access the vendor.
- Password: Enter the password associated with the user account.
- The following options are specific to MedAssets configurations only.
- Facility User Name: Enter the name your facility uses to access your MedAssets solution.
- Organization Name: Enter the name your organization uses in your MedAssets solution.
-
The following options are specific to PeopleSoft configurations only.
- Window forward: Enter the number of days in the future to pull Staff Manager schedule data to be sent to PeopleSoft.
- Window back: Enter the number of days in the past to pull Staff Manager schedule data to be sent to PeopleSoft.
- The following options are specific to ERM configurations.
- Employee Number is Vendor specific: Select the check box to have Staff Manager use an External Employee ID when matching employees.
- Add assigned employees if not in Cerner Clairvia: Select the check box to have the employee added as a new employee in Staff Manager if the employee does not already exist. You usually use this option when you use your vendor application to manage agency employees.
- Cancellation Task Reassignment: Select the task name the application should use to automatically reassign an employee to when they are canceled by an ERM application. Each list contains all qualified tasks as defined in Staff Manager. The ERM application sets a flag in the cancellation record defining who made the cancellation. In addition, the application performs a comparison to ensure that the profile has the task defined when making the reassignment. If the task is not defined for the selected profile, the employee is only removed from the opportunity and not reassigned.
- Select an Agency Canceled option from the menu.
- Select a Facility Canceled option from the menu.
- Ensure that the employee is not a facility employee: Select the check box to have Staff Manager make sure employees assigned by ERM are not already employed within a profile of your facility. If you select this check box, Staff Manager automatically rejects any ERM assignment using facility employees. Deselect the check box if you do not want any validation.
- Matching Threshold: Enter a value, in minutes, that Staff Manager should use to match Staff Manager tasks to an ERM assignment based on the start and end times.
- Add Non-Per-Diem Contractor to Scheduling Profile: When Staff Manager adds a non-per-diem contractor, the contractor is normally assigned to a home profile (such as Agency) different from the profile where the employee is scheduled (such as 6N MedSurg). Selecting this check box tells Staff Manager to add non-per-diem contractors to the scheduling profile.
- Error Threshold: Enter the number of times Staff Manager should resend transactions that receive an error in the vendor application.
- Available Profiles: Select the check box for each Facility and Profile to use this configuration. This list is sorted in ascending alphabetic by Facilities and then by Profiles within each facility. Selecting a Facility check box automatically selects all the Profiles within it.
- Click Save.
While you can assign any profile to multiple interface configurations, you can only assign a profile to one configuration for a particular vendor. For example, if your facility has one ShiftAlert configuration (Vortex) and two ERM configurations (such as MedAssets), you can assign a profile to the Vortex configuration and one of the MedAssets configurations, but not to both MedAssets configurations.
You can click Reset to undo any edits made since you last saved the configuration.
If your selected profile has a configuration assignment conflict, Staff Manager alerts you and displays the affected configuration.
Editing a Vendor Configuration
Complete the following steps to edit a vendor configuration:
- From the Configure menu, select External Resource Management. This opens the External Resource Management page.
- Select a configuration in the Vendor Configurations.
- Make your edits.
- Click Save.
Copying a Vendor Configuration
You can use the Copy Configuration function to create a new configuration using the data of a selected configuration. The function copies all other options, including posting group data, from the highlighted configuration.
- From the Configure menu, select External Resource Management. This opens the External Resource Management page.
- Select a configuration in the Vendor Configurations pane.
- Click the Copy link. This opens a new configuration named Copy of [selected configuration name].
- Make any edits, such as renaming the configuration.
- Click Save.
You can click Reset to undo any edits made since you last saved the configuration.
Deleting a Vendor Configuration
You can remove a configuration using the Delete Configuration function. Be careful when deleting a vendor configuration, as deletions cannot be undone.
- From the Configure menu, select External Resource Management. This opens the External Resource Management page.
- Select the configuration in the Vendor Configurations pane.
- Click the Delete link.
- Click OK to accept the deletion.
 Related Topics