In-App Help was last updated in 8.6.4 (released 10/23/2019) if you are looking for help with a feature that has been added or enhanced since 8.6.4, please check in Online Help from Help menu.
Configuring Outcomes-Driven Acuity
Note: Your Staff Manager configuration may not include this optional application. To add this application to your configuration, contact your Clinical Consultant or Client Advocate.
Outcomes-Driven Acuity focuses on each patient’s clinical progress toward desired outcomes. Staffing levels are based on the skill sets required to move each patient to the next level of wellness, according to the care team’s assessment of his or her current condition.
You must have Demand Manager installed and configured in order to use Outcomes-Driven Acuity.
Before you can configure Outcomes-Driven Acuity, you must be assigned to a security group with the correct Acuity Configuration permissions.
- Users assigned Full Acuity Configuration permission can configure Outcomes-Driven Acuity. They are also allowed to save and publish configuration data.
- Users assigned Read permission can view Acuity configuration data but cannot change it.
- Users assigned None permission do not see the Acuity configuration page in Clairvia Web.
Managers assign security groups and permissions in Staff Manager Administrator.
Enabling the Acuity Settings Sub-Tab
The Clinical Consultant uses the following steps to enable the Acuity Settings sub-tab prior to the Target Staffing Validation phase of implementation. This allows the consultant to enter acuity information for the locations that use Outcomes-Driven Acuity.
- From the Configure menu, select Demand Manager > Location Settings. This opens the Location Settings page with the Demand Settings tab active.
- Click the Options tab.
- Select Enable Acuity Settings.
- Click Save.
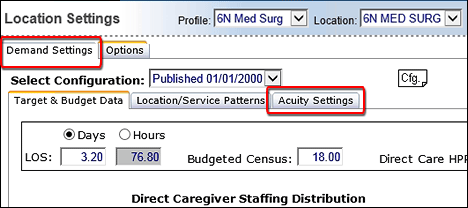
The Demand Settings tab now displays the Acuity Settings sub-tab.
The following illustration shows the Locations Settings page Options tab with Enable Acuity Settings selected.
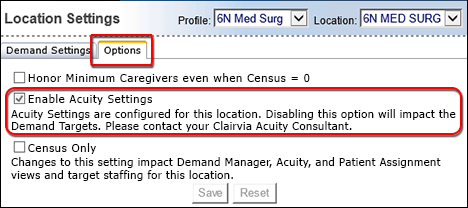
Enabling acuity settings adds the Acuity Settings sub-tab to the Demand Settings tab.
Clicking the Acuity Settings sub-tab lets you select your acuity settings.
Configuring Acuity Location Settings
Complete the following steps to configure acuity location settings:
- Make sure the information is complete on the Demand Settings Target & Budget Data and Location/Service Pattern sub-tabs.
- In the Calculated Values box on the Target and Budget Data sub-tab, click Update. If any of the following issues occur, save the configuration as Draft and contact your Clinical Consultant for further direction.
- If the HPPD Variance is greater than 0.5 after reassessing and adjusting the Direct Care HPPD, direct caregiver staffing distribution table, and budgeted census as needed.
- If any edits on the Target and Budget Data sub-tab affect the Staff Manager calculation of Target Staffing. Changes to the following options affect the Target Staffing calculation.
- Budgeted LOS
- Budgeted Census
- Any changes in the Direct Caregiver Staffing Distribution table
- Any changes to the ADT Events table: ADT percent, ADT Total Minutes, or both
- If the HPPD Variance is equal to or less than 0.5 and your changes did not affect the Target Staffing calculation, click Save and Publish to publish the configuration.
Using the Acuity Settings Sub-Tab
Your Cerner Clairvia Clinical Consultant enables acuity settings and enters the data required on this page during your Outcomes-Driven Acuity implementation.
Caution: Since Staff Manager uses the information on this page to calculate Target Staffing for the location, you should only enter data on this page if directed to by your Cerner Clairvia Clinical Consultant.
- Open the Location Settings page and select a location and configuration. The Target and Budget Data sub-tab is open by default.
- Click the Acuity Settings sub-tab to make it the active sub-tab.
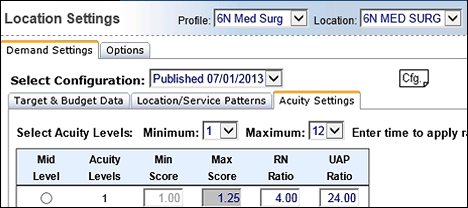
- Select Acuity Levels. Minimum and maximum acuity levels should be consistent for all profiles across a facility.
- Select a Minimum acuity level from the menu.
- Select a Maximum acuity level from the menu.
- Enter the time to apply ratios (hhmm): Outcomes-Driven Acuity uses this value to designate the time of day associated with the ratios entered by global skill for each acuity level. In most cases, the Clinical Consultant enters the time of day with the highest HPPS; this may be the anchor time or the first shift of the day, such as 0600 or 0700. You should enter the value using the 24-hour HHMM format (Hour Hour Minute Minute). For example, to select 3:00 p.m. enter 1500.
- Select the Mid Level Acuity by clicking the option button beside the value you want. This denotes the mid-level acuity for each location that aligns to the average patient.
- Enter a Min Score for each acuity level. Outcomes-Driven Acuity automatically completes each Max Score based on your Min Score entries. These are the minimum and maximum acuity assessment scores for the selected location for each acuity level. For example, if the min score for acuity level 5 is 3.30 and the max score is 3.72, an assessment score of 3.40 generates an acuity level of 5 for a patient in this location. The minimum score for the minimum acuity level is automatically set to 1.00; the maximum score of the maximum level automatically set to 5.00. Assessment scores for the acuity level must be greater than or equal to the minimum score and less than the maximum score. In the preceding example, an assessment score of 3.30 is acuity level 5, an assessment score of 3.72 is acuity level 6.
- Enter a Global Skill Ratio: After completing the data array analysis, the Cerner Clairvia Clinical Consultant enters the caregiver:pt ratio (1:xx) for each global skill by acuity level to achieve the expected ADT-adjusted HPPD alignment across the organization. For example, if each caregiver with the RN skill can take care of 4 patients at the Acuity Level 5, enter 4 in the column for Acuity Level 5. Outcomes-Driven Acuity automatically creates a column for each global skill entered in the Direct Care Staffing Distribution table on the Target and Budget Data sub-tab; columns are added or removed based on changes to skills in the table. For example, if the only global skill in the Direct Care Staffing Distribution table is RN, the Acuity Settings sub-tab only displays the column RN Ratio. If both the RN skill and the UAP skill are in the table, the Acuity Settings sub-tab displays both an RN Ratio column and a UAP Ratio column.
- ADT-adjusted Demand Target Ratios: Click this link to see the ADT-adjusted caregiver to patient ratios and HPPS calculated using the location and staffing data on the Demand Settings tab.
- Save changes by clicking one of the following action buttons.
- Click Draft to save current Demand Settings information as a work in progress or draft. Staff Manager then updates the Selection Configuration list to show the draft and the date and time you saved it.
- Click Save and Publish to select the effective date of the configuration; this is the date that Staff Manager begins using the data in Demand Manager and Outcomes-Driven Acuity.
Configuring Acuity Facility Settings
The steps for configuring Acuity facility settings are the same as those for configuring Demand Manager facility settings. Since Demand Manager must be installed and configured before configuring Outcomes-Driven Patient Acuity, you may find that these steps have already been completed.
You can click Reset to undo any edits made since you last saved the configuration.
Sending Acuity Data to CareAware iBus
If your organization uses CareAware iBus and Outcomes-Driven Acuity, you can configure the solution to send acuity data through the iBus for use in other Cerner clinical solutions, such as Cerner Millennium. See Configuring Facility Settings: The Clinical Event Mapping Tab and Configuring Facility Settings: The iBus Tab for more information.
 Related Topics