In-App Help was last updated in 8.6.4 (released 10/23/2019) if you are looking for help with a feature that has been added or enhanced since 8.6.4, please check in Online Help from Help menu.
You use access groups to define which employees are able to enter requests by defined period. You can define access groups by seniority, employment status (full-time, part-time, or per diem), primary shift, adjusted date, or other criteria.
Once you define access groups, you assign each group to an access schedule period. The access group an employee is associated with then determines when that employee can make requests and see schedules (if enabled by profile). One access group is required for each defined access period.
Clairvia Web saves Access Group Definition configuration changes on a first come, first served basis. If multiple users make changes to the same profile at the same time, the first person to click Save has their configuration saved. All other users receive the message This data has been updated by another user. Your changes cannot be saved.
You can click Reset to undo any edits made since you last saved the configuration.
Complete the following steps to add an access group definition:
By default, Staff Manager assigns all employees to an access group called Unassigned until someone assigns some or all employees to a specific group. This means you do not have to assign every employee to an access group within a profile. Instead, you can focus on creating the access groups for the most targeted situations and allow the Unassigned group to cover the less defined or the default access. As new employees are added to a profile, Staff Manager automatically adds them to the Unassigned access group.
Staff Manager remembers which groups you assigned employees to even after they have transferred out of the profile. If employees later transfer back into their original profile, Staff Manager re-assigns the employees to their original groups. This can cause confusion for managers who may not know the employees' histories or which groups they were originally in. For this reason, the best practice is for you to remove employees from their access groups upon transfer out.
EXAMPLE
Jane Doe is an employee in the ICU profile and assigned to the ICU Seniority 3 access group. Jane then transfers to the 6N MedSurg group, and her new supervisor assigns Jane to the 6N MedSurg Senior Staff access group. Jane's previous supervisor, however, forgets to remove Jane from the ICU Seniority 3 access group.
Six months after Jane's transfer, the manager sees Jane in the ICU Seniority 3 group. Unless someone authorizes Jane to make requests in ICU; however, this association is irrelevant. Two years later, Jane transfers back to the ICU profile, which now has a new manager. When the new manager tries to assign Jane to an ICU access group, he unexpectedly notices that Jane is already a member of the ICU Seniority 3 access group.
See the following section Understanding the Unassigned Access Group for more information.
As you add employees to groups, Staff Manager moves the employee names from the Available Employees box to the Mapped Employees box. For employees already assigned to a group, Staff Manager displays the group name in parenthesis () after the employee’s name, such as Doe, Jane (Group 1).
To add an already assigned employee to a group, click the employee's name and click Add. Staff Manager automatically removes the employee from their existing group and adds them to the selected group.
Staff Manager limits group name displays to the group the employee is assigned to in the currently selected profile. For example, if an employee is in Group A in Profile 1 and Group D in Profile 2, when you view the employee in Profile 2, you will see Employee Name (Group D).
While you can map employees to different groups in different profiles, each employee can only be assigned to one group within a profile.
Complete the following steps to edit an access group definition:
Complete the following steps to delete an access group definition:
When you delete an Access Group Definition, you are deleting all access schedule associations with the group also. If there are employee associations for the group, Staff Manager displays the following warning: There are employees assigned to this Access Group. If the Group is deleted, these employees are assigned to the Unassigned Access Group. Would you like to continue? You should click Yes to delete the Group, Employee, and Schedule associations, or click No to keep the group with all associations intact.
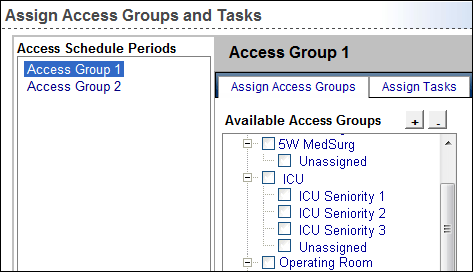
You cannot see or edit the Unassigned group on Access Group Definitions page; however, you can use the Unassigned group on the Assign Access Groups and Tasks page. Because of this, you do not have to assign every profile employee to an access group. Instead, you can focus on creating the access groups needed for their specific situations.
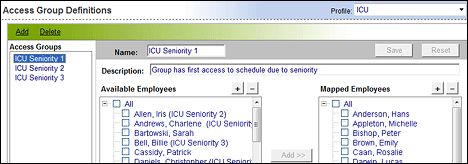
For example, assume Terry is the manager of an ICU profile. Terry wants four access groups based on employee seniority dates. She only needs to define the first three access groups and map the desired employees to them since, by default, all other ICU employees belong to the Unassigned group. The following illustration shows Terry's three groups:

Since Terry has selected ICU Seniority 1, the Mapped Employees box displays the members in that group. All other employees display in the Available Employees box. Employees mapped to groups 2 and 3 display their access group beside their names. Employees who have not been mapped to a group have nothing after their names; they belong to the Unassigned group.
The following illustration shows Terry's Assign Access Groups and Tasks page; she now has the four groups she wanted to assign access groups and tasks.
